How to cancel your Shopify subscription: A clear, step-by-step guide

Deciding to close your Shopify store or move to a different platform can feel like a big step. Whether your business is pivoting, taking a break, or you’ve simply found a better fit elsewhere, knowing how to cancel Shopify subscription properly is essential. You have to make sure the process is smooth, your data is safe, and you avoid any unexpected charges.

As someone who has guided many business owners through these transitions, I understand the mix of excitement and apprehension you might feel. It’s not just about clicking a button; it’s about a strategic exit. This guide will walk you through everything you need to know, ensuring you deactivate your Shopify store with ease.

cancel your Shopify subscription guide

Why would you need to cancel a Shopify subscription?

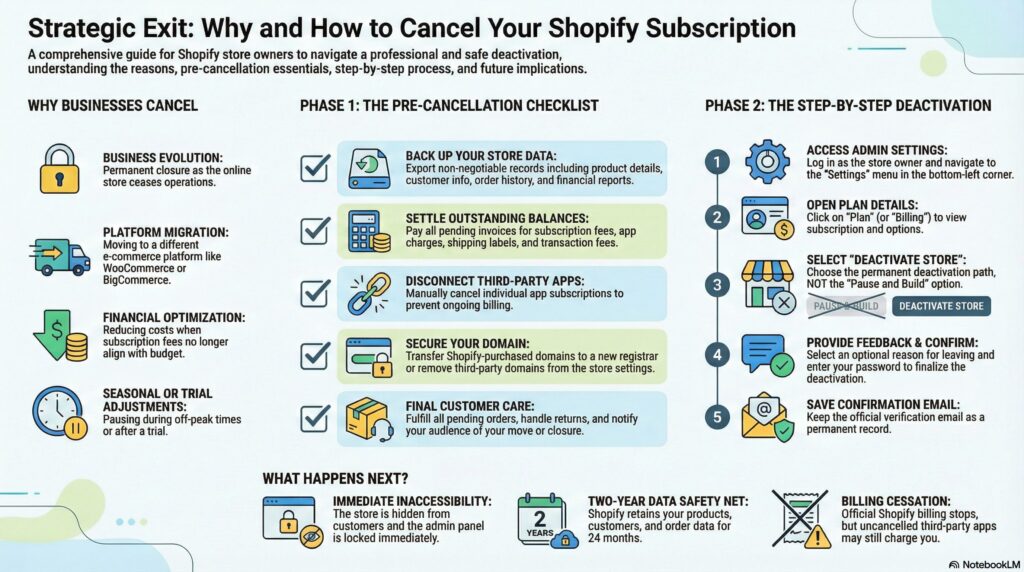
Businesses evolve, and so do their needs. There are many valid reasons why you might consider deactivating your Shopify account:

  • Business closure: You’re permanently shutting down your online store.
  • Platform migration: You’ve decided to move your e-commerce operations to another platform that better suits your needs (e.g., WooCommerce, BigCommerce).
  • Cost reduction: Shopify’s subscription fees no longer align with your budget or sales volume.
  • Seasonal breaks: Your business operates seasonally, and you want to pause operations during off-peak times.
  • Trial period ended: You were testing the platform and decided it wasn’t the right fit.

Whatever your reason, taking the correct steps ensures a clean break.

Your essential pre-cancellation checklist for Shopify

Before you officially cancel your Shopify subscription, there are critical tasks to complete. Skipping these can lead to headaches, lost data, or lingering charges. Think of this as your “digital moving day” checklist.

1. Back up your store data

This is non-negotiable. Your store holds valuable information. Export the following:

  • Product Data: Product details, images, descriptions.
  • Customer Information: Names, email addresses, order history.
  • Order History: Records of all past sales.
  • Financial Reports: Sales data, tax reports, payout history (especially if using Shopify Payments).

You can usually find export options within your Shopify admin under “Settings” or specific sections like “Products” or “Orders.”

2. Settle all outstanding payments

Ensure your Shopify account is clear of any pending invoices. This includes:

  • Your current subscription fees.
  • Any outstanding app charges.
  • Shipping label costs.
  • Transaction fees.

Shopify does not offer refunds for unused portions of your subscription period. If you’re halfway through a monthly or annual plan, consider canceling closer to the end of your billing cycle to maximize value.

3. Cancel third-party apps and services

Many Shopify stores rely on apps from the App Store. These often have their own billing cycles.

  • Go to your Shopify admin > Apps.
  • Review all installed apps and cancel any recurring subscriptions directly within the app settings or by contacting the app developer. This prevents charges after your store is gone.

4. Manage your custom domain

What do you want to do with your website address?

  • Shopify-purchased domains: If you bought your domain through Shopify, you can transfer it to another domain registrar (like GoDaddy or Namecheap) or another platform. Start this process early, as transfers can take a few days.
  • Third-party domains: If your domain is registered elsewhere (e.g., GoDaddy), remove it from your Shopify store first. Then, make sure to disable auto-renewal with your domain provider to avoid future charges.
  • HSTS policy: Be aware that Shopify’s HTTP Strict Transport Security (HSTS) policy can remain on your domain for up to 90 days, potentially causing browser warnings if you transfer it to a platform without HTTPS.

5. Inform your customers and fulfill orders

Transparency is key.

  • Outstanding orders: Make sure all pending orders are processed and shipped.
  • Returns/refunds: Handle any ongoing customer service issues.
  • Notify customers: If you’re moving platforms, let your customers know where to find you next. If closing, consider a final sale to clear inventory.

How to cancel Shopify subscription: Step-by-step instructions

Once you’ve completed your pre-cancellation checklist, you’re ready to proceed. Remember, only the store owner can perform these steps.

Here’s exactly how to cancel your Shopify subscription:

Step 1: Log in to your Shopify admin

Go to shopify.com and log in using your store owner credentials.

Step 2: Navigate to settings

In your Shopify admin dashboard, look for the “Settings” option. It’s usually in the bottom-left corner of the screen. Click on it.

Step 3: Access your plan details

Within the Settings menu, click on “Plan” (or sometimes “Billing,” depending on your Shopify version). This section displays your current subscription and billing information.

Step 4: Pause or deactivate your store

Here, Shopify offers two main paths:

  • Pause and Build Plan: If you’re just taking a break and plan to reopen, this is a great option. It reduces your subscription fee to a minimal amount (often $9/month) while allowing you to access your admin, edit products, and prepare for a relaunch. Your store remains hidden from customers.
  • Deactivate Store: To permanently close your store and cancel your subscription, click “Deactivate store.”
    • Action: Choose “Deactivate store” if you want to cancel your Shopify subscription entirely.

Step 5: Provide a reason (optional)

Shopify will ask you why you’re closing your store. You can select an option from the dropdown menu. This feedback is optional but helps Shopify improve its platform.

Step 6: Confirm deactivation

After selecting your reason (or skipping it), click “Continue” or “Deactivate store.” You may need to enter your Shopify password to finalize the cancellation.

Step 7: Receive confirmation

Shopify will send a confirmation email to the store owner’s email address, verifying that your subscription has been successfully canceled and your store deactivated. Keep this email for your records.

What happens after you cancel your Shopify subscription?

Once your store is deactivated, here’s what to expect:

  • Store inaccessibility: Your online store will no longer be visible to customers. You won’t be able to log into the admin panel (unless reactivating).
  • Data retention: Shopify typically retains your store’s data for up to two years. This means if you decide to reactivate your store within that timeframe, your products, customers, and orders will still be there.
  • No further charges: You will no longer be billed for Shopify subscription fees. However, any third-party app subscriptions you didn’t cancel separately might continue billing you.
  • Domain control: If you transferred your custom domain, you retain control over it through your new registrar.

Alternatives to full cancellation

Not ready for a permanent goodbye? Shopify offers flexible options:

  1. Pause and build plan: As mentioned, this is perfect for seasonal businesses or those needing a temporary break. You pay a reduced fee, your store is offline, but your admin access and store data remain intact.
  2. Downgrade your plan: If high costs are the issue, consider switching to a cheaper Shopify plan with fewer features. This allows you to keep your store active and selling without the full expense of a higher-tier plan. You can do this from the “Plan” section in your Shopify settings.
  3. Contact Shopify support: If you’re unsure or facing unique circumstances, reaching out to Shopify’s support team can provide tailored advice and solutions.

Ready to make your move?

Canceling your Shopify subscription doesn’t have to be a daunting task. By following these structured steps and completing the pre-cancellation checklist, you can ensure a smooth transition, protect your valuable data, and avoid any unwanted surprises.

Whether you’re moving to a new platform, taking a well-deserved break, or closing your business chapter, approach this process methodically. Your business deserves a clean exit.

Frequently asked questions

Can I cancel my Shopify subscription at any time?

Yes, you can cancel your Shopify subscription at any time. However, Shopify generally does not offer refunds for any unused portion of your billing cycle. It’s often best to cancel close to the end of your current subscription period if you want to get the most value.

Will I lose my data after canceling Shopify?

Shopify retains your store’s data, including products, customers, and orders, for up to two years after deactivation. If you decide to reactivate your store within this two-year window, your information will still be available. After two years, Shopify may permanently delete your data.

Can I reopen my store after canceling?

Yes, you can reactivate your store within two years of deactivation. Simply log back into your Shopify admin with your original credentials. You’ll be prompted to choose a new subscription plan to bring your store back online.

How do I transfer my domain before canceling Shopify?

If you bought your domain through Shopify, go to “Online Store” > “Domains” in your Shopify admin. There, you’ll find options to manage or transfer your domain to a third-party registrar. If your domain is already with a third-party, simply remove it from Shopify, and manage it directly through your registrar.

What happens to my third-party apps after cancellation?

Third-party apps are typically billed separately from your main Shopify subscription. Deactivating your Shopify store does not automatically cancel these app subscriptions. You must go into your Shopify admin, navigate to the “Apps” section, and cancel each app’s subscription individually to avoid continued charges.

Share this article on
Ram
Ram

Leave a Reply

Your email address will not be published. Required fields are marked *